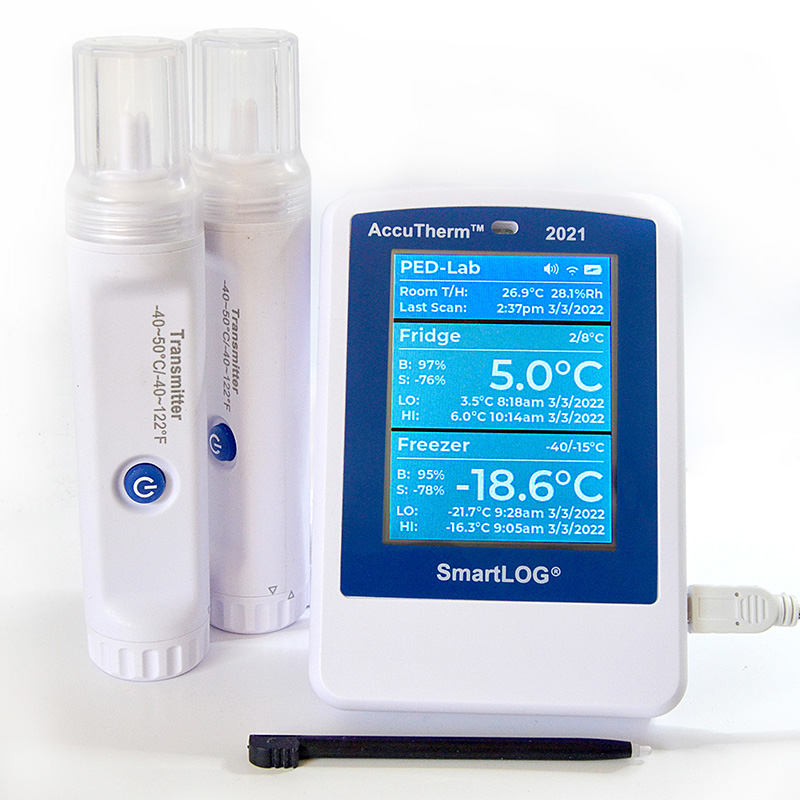
ACCSL2021 SmartLOG® is a WiFi enabled Digital Data Logger (DDL) (also called SmartLOG in this article) featuring wireless external sensor(s) which monitor and record temperature of up to two appliances simultaneously. This could be any combination of refrigerators, freezers, and/or ambient temperature.
The DDL scans for the wireless sensor(s) in 1 minute intervals retrieving temperature, battery and signal data. This data is analyzed to look for temperature swings, limited battery life, or a lack of data indicating a wireless sensor signal loss. The SmartLOG® will notify the contacts specified on the dashboard’s settings page via text message and email if any of these criteria hold true. A temperature excursion will cause a visual alert LED and audible buzzer to sound. The main DDL display screen and dashboard are refreshed with the most recent values by the logger.
Features of the wireless sensor(s) include no wires to be jumbled in/out of appliance ports, appliance seals being breached or requirement to be returned for calibration services. Simply source a new wireless sensor (ACCSLBLET) and pair with the existing DDL.
A web browser is used via PC or Smart device to access the SmartLOG® dashboard. Using the dashboard, you configure and adjust sensor settings, produce PDF reports for regulatory compliance, monitor all DDL statistics, and review status of monitored appliances.
Wireless Temperature Sensor(s) Setup
To set up the ACCSL2021 wireless temperature sensor(s), follow these steps:
- Install 2 AAA batteries. Rotate the clip cap 1/8 degree counterclockwise to release it.
- Insert the negative end of the batteries first.
- Press in and twist 1/8 turn clockwise to bring the printed arrows on the clip cap and sensor into close alignment with one another.
- Press the power button until the blue LED flashes five times to turn on the wireless sensor. Every ten seconds, the LED should flash. To power off the sensor, press the power button until the LED flashes two times, then release the button.
- Locate the four-digit serial number on the rear of the sensor or sensors, write it down, and link it to the intended P1/P2 on the settings page (e.g., P1 Name: Fridge SN# 000E)
- Place wireless sensor in storage unit to be monitored. Allow the sensor temperature to equilibrate before setting up DDL parameters. This will require you to wait approximately 60 minutes.
SmartLOG® Digital Data Logger (DDL) Setup
NOTE: The following instructions are only necessary on the initial Start-up of SmartLOG®. All configuration settings will be saved in the DDL memory.
To set up the SmartLOG DDL, follow these steps:
- Place three AA batteries in the compartment behind the DDL. To open, slide the cover down. Batteries are for backup ONLY! Use wall 110V AC adapter as your main power source.
- Use a USB cable to attach the wall 110VAC adapter to the DDL, then insert the AC adapter into the wall outlet.
- Press and hold the SmartLOG DDL’s ON button, located on the back of the device until you hear a beep, then let go.
- “Scanning For Networks” will appear on the screen.
- Once the scan is finished, the screen will read “Select Network”. Tap on this using the provided plastic stylus
- The names of the WiFi networks (SSIDs) will be listed in a drop-down menu, arranged by networks closest to, to farthest from you. Tap the name of the network you wish to connect to.
- A keyboard and password field will show up; type in the password for the wireless network.
- To confirm values, tap the return key in the lower right corner of the keyboard. The DDL will now establish a network connection.
- A notice telling you to finish the remaining setup with a web browser will appear if SmartLOG is successful in connecting to the network. Complete the settings by following the “Dashboard” section. The SmartLOG data logger will go back to step 4 above if it is unable to establish a network connection, requiring you to repeat steps 4-9 until the connection is successful.
- A ‘guest’ network connection is not able to be used.
Dashboard
The dashboard is a web-based interface that allows you to monitor all DDL conditions, generate PDF reports, and change settings using a web browser on a PC or smart phone.
To access the dashboard, follow these steps:
- Launch a web browser and enter the SmartLOG DDL’s IP address that appears on the DDL’s main screen.
- Type in the username and password you established when you first set up the DDL.
- The dashboard will be visible to you, consisting of four tabs: Help, Reports, Settings, and Overview.
- On the Overview tab, you can see current status of the wireless sensors, the backup battery voltage, the alarm status, the ambient room temperature and humidity, and the strength of the Wi-Fi signal.
- On the Reports tab, you can generate PDF reports of the temperature data for a chosen period of time. It is recommended that it is generated on a more frequent basis rather than monthly.
- On the Settings tab, you can change various settings such as alarm thresholds, email/text contacts, wireless sensor names/serial numbers, time zone, date format, etc.
- On the Help tab, you can find useful information such as the user manual, FAQ, contact details, etc.
This article should help you get started with the ACCSL2021 SmartLog refrigerator/freezer thermometer data logger. If you have any questions or feedback, please feel free to contact us. Thank you for choosing SmartLOG!

